Communications Centre - Help Documentation
Quick Intro
Welcome to the help documentation
for the Communications Centre module in Havenstar. The module will allow you to
send out communications in various methods, including SMS and Email, at the
current time. There will also be the option to create hard copies to print out
and send to customer addresses, at a later date.
Finding the Module
This module can be found
under the CRM section in the Navbar panel, and will also appear as a
search result by entering one of the following keywords into the Navbar search
box:
- Comms
- Communication
- SMS
- Email
Note, to
send out SMS messages, Credits should be purchased by the marina.
Opening the Module
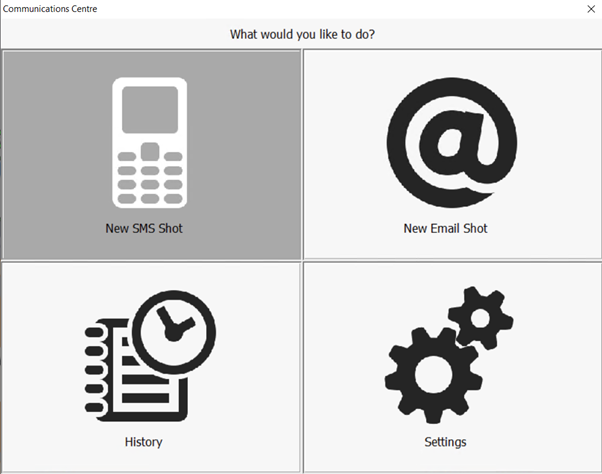
Upon first opening the
module, you are presented with a menu asking which communication you’d like to
use. You will notice there is also a History and Settings option - these will
be discussed later in the document.
Exploring the SMS Communications option
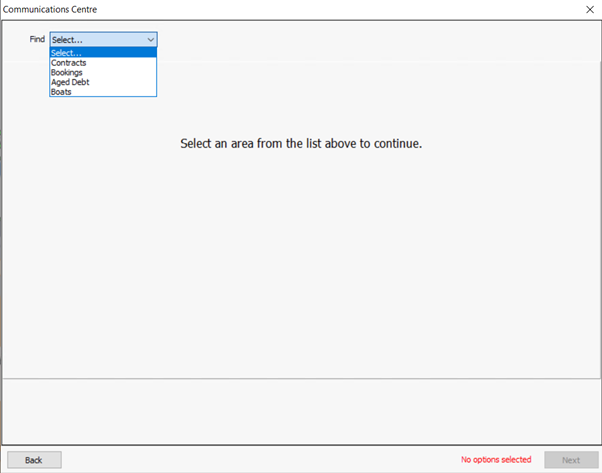
After selecting the SMS option, you are first asked to select from a single dropdown list. This option will determine the what the communication relates to – either:
- Contracts
- Bookings
- Aged Debt
- Boats
Note, the
options on this screen remain the same, regardless of the communication method
selected on the previous screen.
Contracts (and other sections)
Note, Bookings, Aged Debt, and Boats sections will all have their own individual filters, but the process followed is the same.
You are presented with several filters to make selections from. As you make selections, additional filter boxes will appear to help focus your criteria. The idea is to try to narrow down the results to include only the recipients that require this communication.
Note, this document will take you through this various options using the SMS communication method. However, these options remain the same, whether Email, or other communication types are selected.
Note, to help you navigate through the program, you will notice hints placed at the bottom-right of each window. These will provide more information on the current, or subsequent action to be carried out.
Once all mandatory filters selections have been made, click the Next button at the bottom-right of each window to move to the next section of the process. You can move back to the previous screen using the Back button.
The Message and Communications Type
The following screen displays 2 sections.
The first relates to the message to be sent out to recipients – this can be based on an existing Template or can be created as a new, Custom message. Templates can also be edited using the orange Edit button.
A character counter (shown in blue text) will keep track of the size of the message. This becomes more important when sending out SMS messages, as the character limit on an SMS is 160 characters. If this is exceeded, the message will be sent out using more than one SMS, which will use additional Credits.
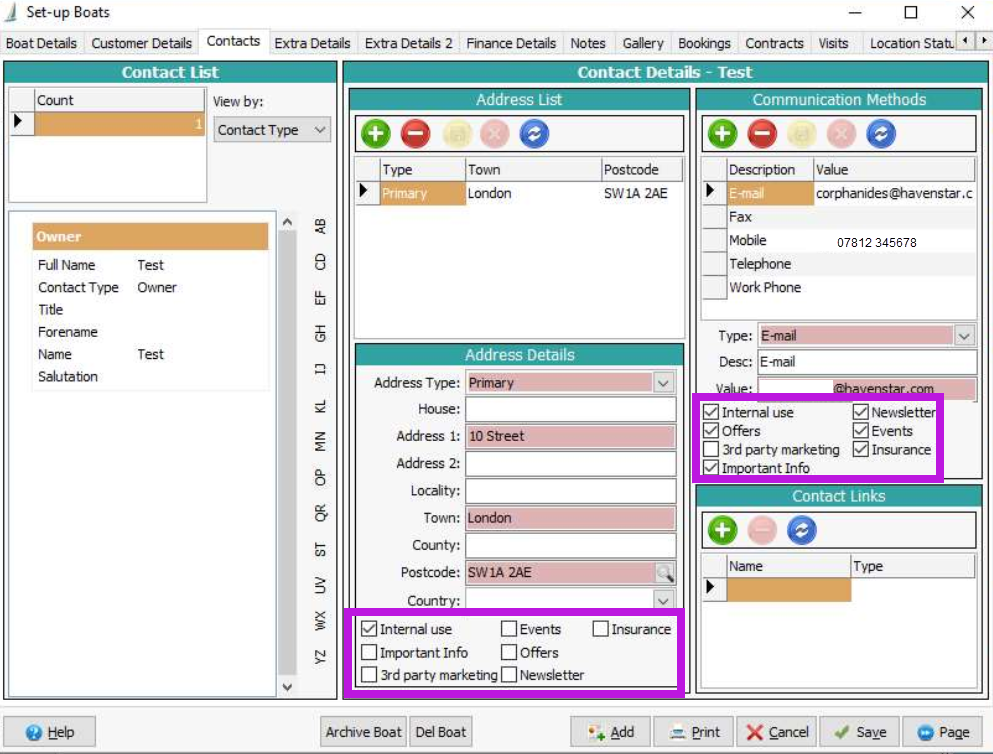
Next, in section 2, a selection must be made on the Communication Type that recipients must have opted into to receive such a communication. To check a user's Communication preferences, go to F10 > Contacts:
Once, a selection has been made, the appropriate recipients are displayed on the right side of the window. Further information on the number of displayed recipients, as well as those that have been excluded from the results, is shown below the recipients list.
The first relates to the message to be sent out to recipients – this can be based on an existing Template or can be created as a new, Custom message. Templates can also be edited using the orange Edit button.
A character counter (shown in blue text) will keep track of the size of the message. This becomes more important when sending out SMS messages, as the character limit on an SMS is 160 characters. If this is exceeded, the message will be sent out using more than one SMS, which will use additional Credits.
Next, in section 2, a selection must be made on the Communication Type that recipients must have opted into to receive such a communication. To check a user's Communication preferences, go to F10 > Contacts:
Once, a selection has been made, the appropriate recipients are displayed on the right side of the window. Further information on the number of displayed recipients, as well as those that have been excluded from the results, is shown below the recipients list.
Sending out the Communication
If you are satisfied that the listed recipients are correct, you can move to
the next screen. Here, you can execute the command to Send out the
communication.
Note, the messages are queued and sent out - as such, this can take some time

Keeping Track of Messages
Once the command to send out the communication to recipients has been executed,
their progress can be checked in the History area. This can be accessed
from the Main Menu.
As shown below, this view shows several coloured rows - each row represents a batch of messages that have been executed to be sent out.
The messages contained within a batch can be viewed by double-clicking on the row or selecting the row, then clicking the Green button. Each message’s row will also be colour coded.
The data can be Refreshed by clicking the Blue button.
Each colour represents
the status of each batch:
·
IN PROGRESS - contains Errors
IN PROGRESS
· COMPLETED
·
COMPLETED WITH ERRORS
Resolving Errors
There may be several reasons that a message has caused an error and could not be sent. Please view the information in a batch or message’s row to find out more. This could be due to things like:
- Missing
or incorrectly formatted email addresses.
- Missing
or incorrectly formatted mobile numbers.
- Missing
or incorrectly formatted physical addresses.
To resolve such
issues, please make a note of the customer and make the change in the Customer Details
tab, accessing through the F10 window.
Settings
Finally, the Settings area can be accessed from the Main Menu.
·
Here,
SMS and Email Templates can be added, or edited.
·
SMS Automations
can also be configured based on specific events being triggered. Events can include things like; an insurance policy expiring, or an invoicing becoming available for payment.
SMS Templates:
See this article for more information on configuring email templates.
SMS Automations:
Credits
Credits are the virtual currency within the Communications Centre.
For most UK numbers, each time an SMS is sent out, 1 Credit is used.
Low Credits Alert - you will receive a notification when the number of Credits reaches 200. If you would like to change this, please let us know.
To request a top-up, please raise a Support ticket with 'SMS Credit Top-Up' as the subject, as we will get this processed for you.
Related Articles
Advanced Email Templates
Havenstar Email Templates Quick Intro Email templates are used to prepare and reuse content for communicating with your customers, such as marketing content, and important marina information. They can be personalised using dynamic variables, so that ...Havenstar LTS Version 3.34 - Changes and Release Notes
Quick Intro Our latest LTS version 3.34 was released December 2025. Our previous LTS version was 3.27. This article highlights the major and minor changes. Our LTS (Long Term Support) schedule is designed to reduce the frequency and inconvenience of ...Havenstar Reference Guide v3.1 - Direct Debit Manager
The attachment takes you to the full version of the manual so you can print a copy as required. To view the manual, select the tab Attachment and you will then see the link to the file.Special Events - Documentation
Introduction The Special Events feature gives you the ability to associate or "tag" an invoice with a particular "special event". This gives you the ability to report on this data, letting you see the impact of particular events on your revenue and ...Setup Email - Email Templates Fields & Variables
Setup Email - Email Templates Fields & Variables This article pertains to Havenstar version 3.35 and above. Quick Intro This article is a reference for the available dynamic fields and variables that you can use to create personalised email templates ...